 The free program
Perspective Image Correction by Wolfgang Schroeder
corrects “falling lines” (»stürzende Linien«).
I got it from here (Heise), it’s available from sourceforge as well. The newest version seems to be 2.0.0.3., that’s Version 3 of 29 June 2007, 61 MB instead of 24.
Click the small question mark ? in the topmost at far right for manual and version.
 There the new camera lens distortion correction is explained by Wolfgang Schroeder of Düren, the laudable author. You must train it with test pictures of a checkerboard image, provided. In case google for perspectiveimagecorrection in one word.
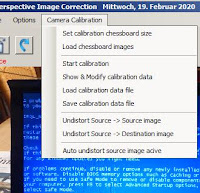
 With the new version you’ll see an added “Camera Calibration” in the menu, at left. I did not play with it, but produced a first “error”: Normally the source picture (here a classic blue screen) appears readily, here on the left. But sometimes, sometimes all you get is a plane, uniform color page, here at right, all black, no content! The color was the color of the picture to be processed, at its corner.
The problem: I had switched the “Auto undistort source image active”. Don’t, unless you know what you do! It stays turned on from one run to the next.
Another great feature, not described in the manual: When you store the corrected image,you can do that in a number of image formats: .BMP, .JPG, .GIF, .PNG. Just set the type in the picture name before storing. Simple and easy.
Some hints for dummies:
• The program will
•
• Start with »File« to »Load Source Image«. Do not dispair: Typically the picture won’t fit at first:
• Use the wheel of your mouse to resize the picture display. Like so:
• To tell the program what you would like as straight rectangle, you have to mark four corners.
Do this with the left mouse button#).
If you make a mistake or want to try another rectangle, cancel with the right mouse button.
On the left, in the original image, you see (if you look closely) red lines and four corners. With those four points I had chosen a piece of the sea front of the Doge’s Palace, alongside the Riva degli Schiavoni. In the »corrected image« at right this rectangle is straight, the rest follows. Danke, Wolfgang!
That’s it.
*) For programs to correct lens distorsions look elsewhere. I took PTLens. In olden times it was free, now it’s much better and costs $ 25.
#) If yo don’t know what’s left or right, you might be a Guugu Yimithirr, see Wikipedia. Or just think that your heart is at the left (mostly) and your liver at the right, but please don’t try to find it yourself.
An exact definition of left vs. right is so difficult that even Wikipedia has given up: » … definitions of left and right based on the geometry of the natural environment are unwieldy … « (»sperrig«).
To define left vs. right you must find a (rare) physical effect that does not follow the usual parity, perhaps here. You’ll get to the »weak fore«, something seldom seen and understood, as one of the four forces around. Grant Hutchinson: »But the principle’s the thing: the weak force is the only one that shows parity violation, so you need to use a weak-force interaction which has been given a unique axis in a magnetic field. That lets you label the magnetic field direction. Then you use the interaction of moving charges and the labelled magnetic field to give you an unequivocal left and right. The neat thing about that interaction is that with the field orientated up and down (which you can describe) and the current orientated near and far (which you can describe), you get a force that goes left and right (which you can't describe).
For further picture corrections I suggest Picasa. It still runs well locally!
Link to here: http://j.mp/2Edbe09 = http://blogabissl.blogspot.com/2015/04/perspective-image-correction-for-dummies.html
(Don’t mail short links, Gmail and others will not transport such “dangerous” messanges, only Whatsapp will treat the addresses nicely.)


Keine Kommentare:
Kommentar veröffentlichen